Beiträge von kwakster

    MDF strops are cheap & easy to make, they already have a perfectly flat surface, the material itself works very well as a substrate for fine diamond or CBN compounds (the only 2 abrasives which will actually cut & shape vanadium carbides), and for me the most important feature: MDF is noticeably harder than leather, so there is much less chance of rounding the apex of your edge.

    This strop is what i give to customers who regularly send or bring me a CRK knife for sharpening and some TLC, so they can maintain & keep the appearance of their new edge themselves for some time at home.


    It's a new & cut-to-size piece of clean MDF coated with a thin layer of 1.0 micron (+/- 14000 grit) mono-diamond compound made by 3M, and i put self-adhesive rubber bumpers (also made by 3M) on the bottom.
    These make the strop non-slip plus they elevate the working surface a bit which makes the strop more convenient to use on a table (more room for your hands)


    The Nyala used as a prop for the pictures was recently reprofiled (from 35-40 degrees inclusive to an even 30 degrees inclusive) & sharpened (with 15 micron diamond compound on a Paper Wheel) and will be picked up by it's owner somewhere in the coming weeks.


    BTW: it's main purpose is to cut oranges, about 5 each day, :D


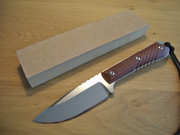
    As the knife seemed to perform just fine chopping wood with an edge of +/- 35 degrees inclusive i decided to grind the blade a bit thinner with a new edge angle of +/- 30 degrees inclusive, according to the motto: as thin as possible, but thick enough.
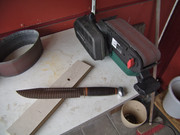
    Most thinning was done on the belt grinder, after which i proceeded on the piece of previously used grit 180 wet & dry SiC paper on top of the glossy magazine.


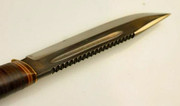
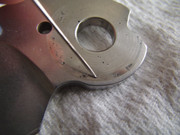
    Due to the waterproof black marker lines on both sides of the blade as well as on the edge apex i could see quite well where the machine removed the steel (up to just before the actual edge area), after which i continued grinding manually on the grit 180 SiC paper to let the sides come together in a new apex (with a slight burr)


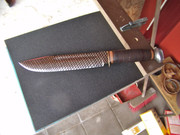
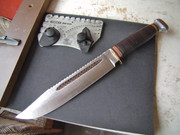
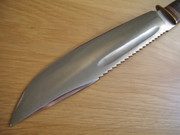
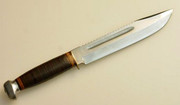
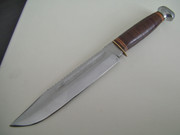
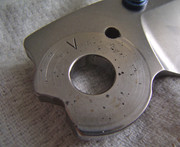
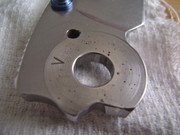
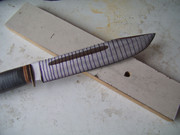
    Before thinning on the belt sander, still with the black marker stripes on the blade:


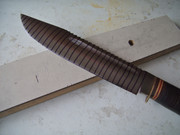
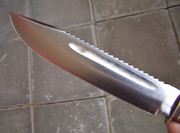
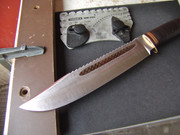
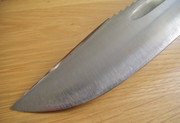
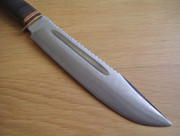
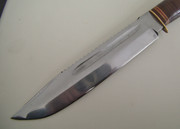
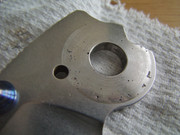
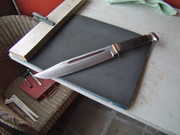
    After thinning on the belt sander (first with grit 100, then grit 120), with the edge area still black from the marker.
    Although the belts have 2 coats of WD40 oil for cooling during grinding, and i dunk the blade into a bucket of water for extra cooling in between passes, the blade is getting progressively thinner, so the chances of overheating the newly forming edge area would still increase if i just ground up to a burr with the belt sander.
    This method avoids not only the overheating part, but also the forming of a thick burr from the grit 120 belt due to which quality steel would be wasted needlessly.
    I also use very little pressure on the belt (about the weight of the knife itself) and let the machine do the work.


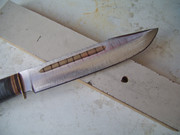
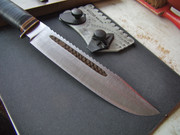
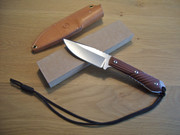
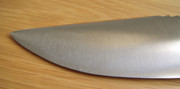
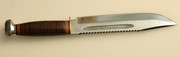
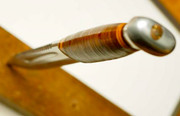
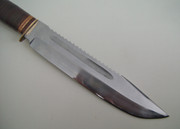
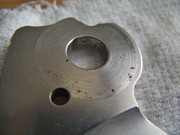
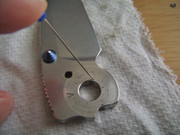
    After hand grinding on grit 180 SiC paper, where the edge area now has been blended in with the sides of the blade.
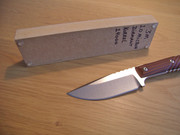
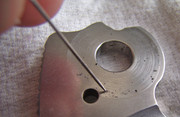
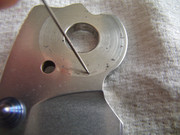
    The black marker is gone and the new apex fits almost perfectly into the 30 degrees slot of my Tormek WM200 AngleGuide.


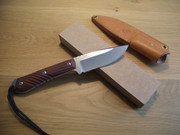
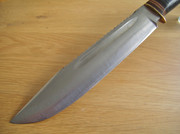
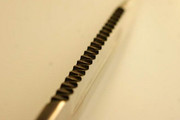
    While difficult to photograph, the visible burr over the entire length of the edge shows that there is now a complete apex, a tell tale sign that grinding with grit 180 is done.
    Soon some further refining steps with grit 240 and grit 400 will follow.


    Refined one step further plus sharpened to a burr with 180 grit SiC wet & dry paper on a glossy magazine, then removed that burr with a Paper Wheel coated with 1.0 micron diamond compound.
    The apex of this temporary edge fits almost perfectly in the 35 degrees slot of my Tormek WM200 AngleMaster.


    Afterwards went to the forest for some testing, and the steel seems to hold up just fine (with this edge angle) for some chopping through various thick green branches as well as a solid chunk out of a dead tree.
    Upon inspection i couldn't see any damage, and the edge also still shaves the hair from my lower leg with ease.
    I think the steel can handle a bit thinner edge.


    This is how the knife looks at this moment:


    About 2 montsh ago i bought a cheap but speed controlled Parkside PBS 900B2 belt sander together with 2 sets of equally cheap aluminium oxide belts at the LIDL supermarket for just under 50 Euro (about 53 US dollar), mainly for the straightforward thinning/regrinding of kitchen knives, which it does very well.
    I spray the belts with WD40 before use, which helps to cool those thin blades during grinding quite effectively, plus it makes the grit cut noticeably faster.


    I've used this machine for the first two rough reshaping steps on the scout knife, and this is how the blade looks atm.
    I tried to avoid as much as possible grinding to a burr, and further convex shaping will be done by hand with various wet & dry SiC papers backed by a glossy magazine.
    The sheath has also been restitched by hand with strong white nylon thread plus i waxed it twice with Granger's beeswax.


    Recently i bought this rather large & sterile Solingen made scout knife from the '50's or '60's as a modifying project.
    The plan is to change the blade from a low saber grind with a buffed to death obtuse edge into a full convex grind with a crisp apex in the region of 30 degrees inclusive.
    This would remove the current non-matching grinds on both sides of the blade, make the knife a much better overall user & chopper, and it would also help to make the saw/notcher on the back work a bit better.


    Next i'm going to exchange the current miniature guard for a larger and more functional version, give the handle a bit of a palm swell for a better grip when chopping, glue all handle parts in place, and finally treat the leather & fiber washers to a few coats of beeswax.
    I will also restitch the sheath as the old thread has dryrotted away completely.


    The knife as i received it:


    Specs:


    Overall length: 13.39 inches (34,0 cm)
    Blade length: 8.18 inches (20,8 cm)
    Blade thickness: 6,5 mm
    Steel: hot drop-forged carbon steel
    Handle material: brass guard, leather & fiber washers, aluminium pommel
    Weight: 384 grams
    Sheath: Leather

    A few weeks ago i bought this little Ultratac K18 in stainless steel on E-Bay, and yesterday it arrived neatly packaged in thick bubble wrap.
    It's an AAA flashlight, that is also factory rated for use with 3,7 Volt lithium-ion 10440 batteries.
    I ordered mine complete with a micro-USB charger & one unprotected Trustfire 10440 battery.
    A few protected 10440's are still on their way.


    Packaging:


    Contents:


    Besides my old Fenix LD01 (which stopped working after almost 10 years of service):


    Micro-USB charger (only for charging a 10440 battery):


    Manual:


    Tested the light a bit last night, and everything seems to work as it should.
    Only had to put a drop of Nano-Oil on the threads & O-ring as these were bone dry.
    Considering the small size of the light the output on high is almost unbelievable, but it also gets quite hot in a few minutes.
    A few night time beam shots follow later.

    From the same owner, a small Sebenza made in 2014.
    Disassembled & cleaned for the last time in January 2016, and put together using 85 as well as 10 weight Nano-Oil.
    Has been used to cut a lot of cardboard boxes as well as 5 oranges a day since then, and was rinsed afterwards under a hot tap, never disassembled.


    Just took it apart for the first time again.
    Corrosion on the pivot area of the blade is less than on the Sebenza 25, but the bushing has suffered quite a lot.
    (pics can be clicked 2 x for a bit more detail)


    I don't know if CRK grease would have done a better job protecting the blade from the orange juice, but my guess is that most lubricants would have been dissolved by the citric acid, especially given the repeated & prolonged exposure to it.
    From testing a few years ago i've learned that the citric acid in just one lemon was enough to corrode the sharp apex away from the edge on a ZDP-189 kitchen knife in about 15 minutes after cutting the lemon into slices and not washing or rinsing the blade afterwards.


    In a corrosion test done on a few forums a while ago by member Loonybin a product called Eezox proved to be the clear winner, while Nano-Oil finished somewhere in the middle of the pack, and CRK grease wasn't tested.
    On the subject of lubricating properties however (which weren't part of that specific test) Loonybin stated that 5 weight Nano-Oil was the best lubricant he had ever come across.
    Personally i like & use all of the Nano-Oil products, from the 5 weight to the Nano-grease, and so far i've found nothing better.
    I even use Nano-Oil products as additives in both the engine & transmission of our 11 year old Toyota, and fuel consumption changed from +/- 1 in 12,5 km to +/- 1 in 15 km.
    I don't think that the Nano-Oil itself played a part in the corrosive reaction on this Sebenza, nor have i ever found this to be the case when using it for any other applications.


    The Sebenza is now put together again using only the 5 weight Nano-Oil, as besides very good lubricating properties this almost watery thin version also has very good penetrating properties, something i think could be of benefit with this degree of pitting in the blade steel.
    The knife action feels like new again, and the pivot pitting doesn't translate into any tactile feedback.


    Something to consider when using Nano-Oil is that although the various oils themselves do take part in the initial lubrication process, their main function is to act as a transport mechanism for the nano particles, which are responsible for the more long term lubrication once they are embedded in the phosphor bronze and the blade steel.
    To get maximum embedding i re-assemble the knife with a few drops of oil on washers & pivot area, then proceed to overtighten the pivot, open & close the blade several times (so while the blade feels a bit stuck), and then open the pivot screw just enough so the blade falls closed when the lockbar is held to the side.

    The lube i used on this Sebenza was 85 weight Nano-Oil on the washers and a few tiny drops of 10 weight Nano-Oil between pivot & blade.
    This provides the user with a little easier "hydraulic" opening & closing action compared to CRK grease and also lasts a long time.
    I always set the pivot tight enough so there isn't even a hint of blade play, yet the blade falls closed on it's own once the lockbar is held aside with my thumb.


    @ ex vento: you could be on to something.
    Maybe the holes in the washers played a role too by holding the citric acid longer than closed washers would have done, but that is just me speculating.
    BTW: just before disassembling & cleaning the knife still opened & closed comparable to one that has dried CRK grease in it's pivot.

    The owner of this Sebenza 25 religiously eats an orange every day at breakfast; the fruit is cut with the knife into several parts, and afterwards the knife is rinsed under a hot tap.
    Over time the orange juice slowly found it's way into the pivot, making the action sticky and the knife slow to open.
    Last time the knife was opened was in the first week of March 2016, and today i opened it again.


    This is how the S35VN blade surface looks after i cleaned off all the sticky gunk, first with a soft tootbrush and some dishwashing liquid, then with some nail polish remover, and finally in an ultrasonic cleaner (to get the last debri out of the pits)
    Given enough time the citric acid in the orange juice clearly seems to damage the S35VN steel, and in some spots the pitting is deep enough to trap the point of a needle.
    Pics can be clicked 2 x for a bit more detail.


    Hinderer XM-18 Slicer grind in S35VN steel.

    According to my Tormek angle gauge the factory edge angle measured between 45 and 50 degrees inclusive, while the thickness of the steel just behind that edge went from 0.7 mm at the heel to 0.6 mm at the tip.

    The knife is going to be used as a hunting folder, and the owner had 2 wishes: if possible no visually wide bevels, plus he wanted to be able to maintain the new edge on a Spyderco Sharpmaker.


    Before sharpening:


    Edge reprofiled to an almost exact 35 degrees inclusive with a Paper Wheel coated with 220 grit SiC, after which the burr was removed with a second Paper Wheel coated with 0.25 micron diamond compound.

    The new edge is what i would call sticky sharp.


    After sharpening:


    Did this user Spyderco PM2 in S30V steel for a customer who had seen pictures online of another PM2 in S110V steel i did earlier, and which are also somewhere in this thread.
    The man wanted the exact same full mirror edge he had seen on the other knife, it had to be 30 degrees inclusive, and it also had to have a guaranteed hair whittling sharpness.
    Of course i told him that this S30V is not the best steel for a full mirror edge, but it was what he wanted, :)


    The old edge had a few flat spots and a bit of a rounded point from use, but nothing serious.
    Total time i spent on this knife was one hour, in a succession of Paper Wheels with 15, 6, 3, and 1 micron diamond compound.
    As a comparison: the same full mirror edge on that PM2 in S110V steel the man saw online took me two hours.
    Most of this time is going into the many visual checks i do in between with my Victorinox loupe under bright light, not into the actual sharpening.


    These are the quick pics i also sent to the customer, and they can be clicked twice for a bit more detail.
    The owner was satisfied btw.


    This is how Simon Hengle, the owner of Tora Blades sharpens a kukri:


    Externer Inhalt www.youtube.com
    Inhalte von externen Seiten werden ohne Ihre Zustimmung nicht automatisch geladen und angezeigt.
    Durch die Aktivierung der externen Inhalte erklären Sie sich damit einverstanden, dass personenbezogene Daten an Drittplattformen übermittelt werden. Mehr Informationen dazu haben wir in unserer Datenschutzerklärung zur Verfügung gestellt.


    I use basically the same method: various kinds of waterproof SiC paper on the back of a writing block (less chance of rounding the apex), clamped together on the edge of a sturdy table.
    That way you can use both hands for sharpening.