
And the result, after a Paper Wheel with 15 micron diamond compound & deburring with a second Paper Wheel with 0.25 diamond compound.
Both edges are treetopping sharp.


And the result, after a Paper Wheel with 15 micron diamond compound & deburring with a second Paper Wheel with 0.25 diamond compound.
Both edges are treetopping sharp.
A Florentine Nr.2 Chef Knife from a professional Dutch sous-Chef after resharpening, as it sadly had a subpar factory/workshop edge.
The new edge was tested after sharpening by cutting several times into a laminated wooden testblock, and afterwards showed zero edge damage when seen through a loupe.
The parlour trick with the tomato was just icing on the cake.
Specs:
Overall length: 14.76 inch (37,5 cm)
Blade length: 9.0 inches (23,0 cm)
Maximum blade thickness: 2,75 mm
Thickness behind the edge: +/- 0,28 mm
Steel: Sandvik 14C28N (from Aldo, the New Jersey steel baron) at 61 HRC with cryo treatment
New edge type: very slightly convex
New edge angle: between 25 & 30 degrees inclusive
New edge finish: 230 grit diamond
Handle material: leather/metal/plastic washers and brass bolsters & endcap.

Modified this vintage Cold Steel Shinobu tanto from the '80's into a much pointier version, with a slightly convex zero secondary edge of +/- 30 degrees inclusive & matching straight edge bevels.
Not yet finished with polishing the edges (still have 0.25 micron to do), but after 1 micron diamond compound they already whittle one of my chest hairs about 3,0 cm from the point of holding.
All work and no play makes Jack a dull boy,


First resharpened the old edge with a Paper Wheel coated with 15 micron diamond compound to get rid of the damaged sections in the apex, then refined it just one step with a second Paper Wheel coated with 6 micron diamond compound.
The new apex can whittle a chest hair towards the hair root (this is noticeably easier than towards the point of the hair), and it also has a little more bite.
Will see how this edge finish holds up in our kitchen, as the knife is already in use again:

Currently busy with the same mod of a (user) Gerber Applegate-Fairbairn folder like i did earlier in post #13.
This is how the knife looked when i received it from the owner, still with a single edge & an edge angle between 40 and 45 degrees inclusive:


And this is how the knife looks after grinding the new edge on the back of the blade & trying to match it with the reprofiled edge on the other side.
The scratch pattern complete with burr remains still present on the apex comes from a Rubber Wheel coated with +/- 170 grit diamond powder & wax (as i haven't made a Paper Wheel with the same diamond powder yet) which i used for this job.


The idea was to make the 2 edges / 4 bevels as visually similar in width & curvature as i could, with a specific edge angle of +/- 35 degrees inclusive, without damaging the names on the blade, and to create a new point that would be centered as much as possible.
Trying to achieve all these things at the same time freehand, together with many checks with a loupe in between passes isn't easy for me, so i took my time.
Tomorrow i plan to continue with 15 micron diamond compound on a Paper Wheel for one of those bling & bite finishes, after which i'm going to take a few more pics.
Waterstones are still the only choice to sharpen & polish Japanese single bevel knives made from simple carbon steel types.
The Paper Wheels are simply not capable to sharpen those like they should be sharpened.
But if you need to be able to sharpen & polish knives made from more modern steels (especially PM steels with high (vanadium) carbide volumes) that have secondary edges, and do it within a reasonable time frame, a set of Paper Wheels with CBN and/or diamond compounds would give you far superior results.
And it is a misconception that sharpening with the Wheels is difficult, as most people i know of seem to master the basics quite fast.
Just remember to start practicing on your Mom's drawer with cheap kitchen knives, not on your Dad's Sebenza, ![]()
I own several vintage Gerbers in M2 steel, both outdoor & kitchen models, and this Durendal slicer model from the '60's does duty in our kitchen.
Opening all kinds of paper & plastic food packages, slicing bags with espresso beans, cutting up larger fruits like melons & pineapples, slicing bread loafs and hamburger buns without crumbling, cutting sausages, etc.
Not every day, but at least several times a week.
I bought this Gerber about 2 years ago on E-Bay completely blunt, so i reprofiled & sharpened it with a SiC grit Paper Wheel, then refined the edge with 15 micron diamond compound on a second Paper Wheel, and then again with 6 micron diamond compound on a third Paper Wheel.
The tiny burr was removed with a fourth Paper Wheel coated with 0,25 micron diamond compound.
The idea was to get something of a semi-polish that would protect the exposed M2 edge better against corrosion issues during kitchen use, while still having some degree of bite.
The knife was then used for about 2 years in our kitchen, and when not in use stored on a magnet strip on our kitchen wall.
After those 2 years the edge only had a few very minor dings/flat spots in it (in the tiny belly area), but it could still shave the hair on the back of my hand on skin level quite well with about 90-95 % of the edge.
When cutting tomatoes however the edge tended to slide a bit over the skin before it started to cut.
The main reason for this kind of edgeholding is of course the fact that most of the edge on a slicer like this never touches a cutting board, only the belly area does, but the M2 steel performed quite admirably in my book.
A few weeks ago i resharpened the edge, this time only with 15 micron diamond compound, then deburred with 0,25 micron diamond compound, as i want to try the knife with some more bite.
Will have to find out if there will be corrosion issues or not.
So far i've only used it on food packaging (both paper & plastic, no fruit or other things yet), but here are a few pics how the knife & edge look now.
The edge feels sticky and is still treetopping sharp.


Specs:
Blade steel: hard chromed M2 steel
Hardness: 60-62 HRC
Handle material: cast on aluminum, chromed.
Overall length: 29,5 cm
Blade length: 16,5 cm
Blade thickness: 1,36 mm in front of the handle tapering to 0,84 mm close to the point
Thickness behind the edge: 0,5 mm
Edge angle: +/- 30 degrees inclusive, slightly convex
Das ist auch mein Problem; ein USB-Microscop zu finden der compatible mit mein Macbook Pro ist.
Was ich jetzt habe wirkt auch nür mit ein PC, und der ist schon ganz alt.
The WM-200 came with my Tormek T7 machine and it's simple and easy to use, just like this one that Spyderco made some time ago: https://www.spyderco.com/forumII/viewtopic.php?t=43017
Or this one: https://www.amazon.com/home-improvement/dp/B000CER0MK
However, i do keep my eyes open for a more precise method, which would be a laser goniometer.
Here is an example that is sold by CATRA: http://www.catra.org/pages/products/kniveslevel1/lgpm.htm
Much cheaper versions seem to exist, but i haven't found an acceptable one yet.
This just came in, and it should be more than enough to coat both a Paper Wheel as well as a Rubber Wheel using the 3-step process.
According to my digital scale it weighs +/- 40 grams.

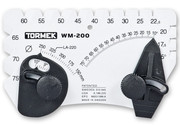
Measuring the edge angle with my USB-microscope isn't possible of course, so for that i use a Tormek WM200 Anglemaster:
In dieser YouTube clip wird erklärt welche Vorteile CBN hat über Aluminium-Oxid (im kurzem: CBN hat eine viel höhere Härte zusammen mit eine viel bessere Wärmeleitfähigkeit)
Es wird English gesprochen, leider könnte ich kein Deutsche Version finden.
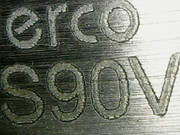
Spyderco Military S90V/Carbon Fiber.
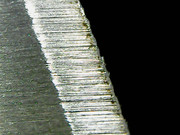
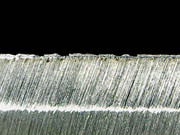
The factory edge on this knife still has a burr attached almost along it's entire length, and also some brownish discoloration in some area's.
Why would it be too slow in your opinion ?
Abboniert auf diesem thread.
I have & use my Tormek T7 with an SB-250 stone several times per week, and i'm very happy with what it can do.
Currently looking around for a CBN wheel for it, especially for knives made from full hard high speed steels.

There is only one proper redneck techique for sharpening your tools...
https://www.youtube.com/watch?v=wdoAVHUFNwM
https://www.youtube.com/watch?v=wdoAVHUFNwM
Okay, you win.
No doubt about it,
![]()
A follow-up took some time, but here it is.
After some cutting tests with this M2 knife i arrived at a measured edge angle between 22.5 and 25 degrees inclusive, as this seems to be right at the balance point between as thin as possible, yet thick enough.
This edge survives multiple full force cuts into my wooden testblock (a piece of laminated desktop) without chipping or noticeable loss of sharpness.
Afterwards the knife could also still pushcut through this paperback.

Found this gem on YouTube:

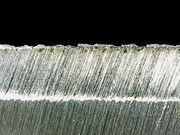
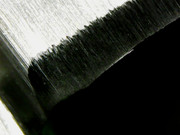
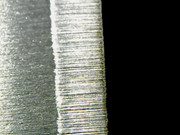
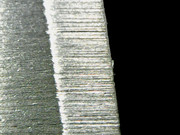
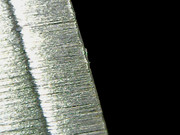
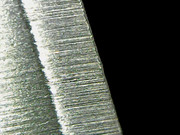
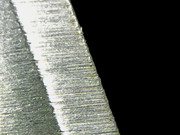
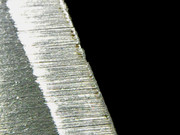
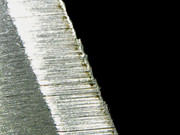
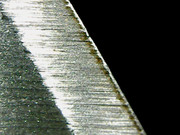
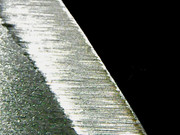
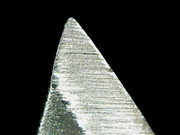
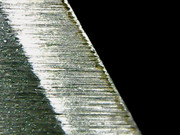
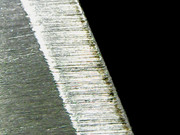
Below you see 3 different viewing angles of the edge i recently put on a brand new Sebenza 25 (which had a subpar factory edge)
The owner of the knife took the pictures with a very expensive Leica camera to capture the different looks this edge type can have when seen from different angles.
For obvious reasons i named this a bling & bite finish, and it performs very well on especially high (vanadium) carbide steels.
I first reprofiled the factory edge from 35 degrees inclusive to 30 degrees inclusive with a Rubber Wheel coated with 230 grit diamond powder, then refined it with a Paper Wheel coated with 15 micron diamond compound, and lastly removed the tiny burr with a second Paper Wheel coated with 0.25 micron diamond compound.
The new and ever so slightly convex edge could treetop the hair on the back of my hand (even whittle it a bit) and easily slice single ply toilet paper.
And this was after i tested the edge with a few firm cuts into the edge of a piece of laminated desktop.


Did these chisel ground edges a a few years ago with a Paper Wheel coated with 15 micron diamond compound, and then stropped the burr on the other side off on hard leather with some 1 micron diamond compound.
Both knives were quite blunt, one even more than the other.
The knives are owned by two Dutch Special Forces guys who used & sharpened them while on tour in Afghanistan, and they wanted the new edges to have a little bling.


This second hand Spyderco Military in CPM-D2 steel was one of the first knives i ever sharpened on my standard set of Paper Wheels back in 2009.
It had some blade play (fixed it), some discoloration on the blade (left that) and it wasn't quite sharp (fixed that with the Wheels)
Was part of my edc for several years.


