Beiträge von kwakster

    Some time ago while surfing the net i found a website with Catra test results for 3 different ceramic knives: two by the well known Japanese Kyocera brand, and one from another (and unfamiliar to me) Japanese brand with the name Forever Company.
    Next to various types of ceramic knives the company also seems to make a host of other specialty kitchen knives from various space-age materials: http://forever-k.com/en/ceramic/
    Anyway, the 3 ceramic knives were tested on wear resistance, and the (much) cheaper Forever knife seemingly won by quite a margin regarding that aspect:


    http://socialcompare.com/en/co…eaux-en-ceramique-mpo3v9w


    Now i know that wear resistance does not equal edge holding (especially with ceramic knives), but who knows ?
    Maybe they're on to something.
    Since i sharpen ceramic knives for others from time to time (and the two tested Kyocera models have always ranked the highest for me in the edge holding department so far), i became a bit curious about the Forever knife.
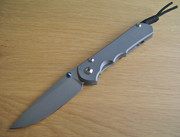
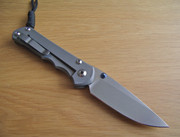
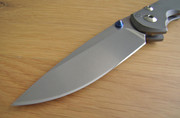
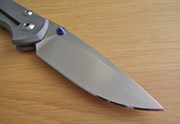
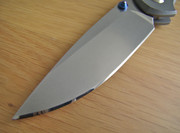
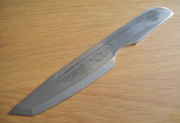
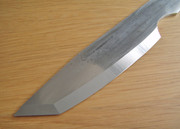
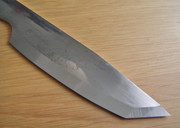
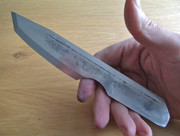
    So i ordered the exact SC-16WB model that was tested from a Japan based E-Bay dealer for 45 US dollars including shipping to the Netherlands, and yesterday it arrived:


    Specs:


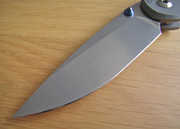
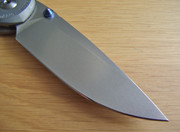
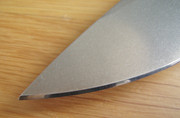
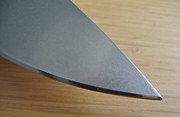
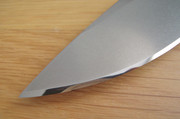
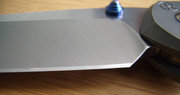
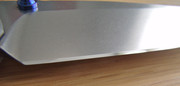
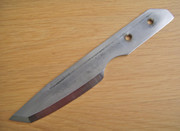
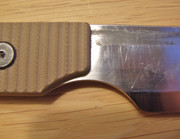
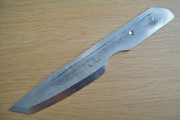
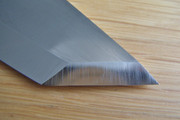
    Ceramic knife for right handed use (non-logo side is flat, while the logo side has a wide saber grind and a 70/30 edge
    Overall length: 10.9 inch (27,6 cm)
    Blade length: 6.3 inch (16,0 cm)
    Blade material: High Density Zirconia
    Blade thickness: 1,43 mm
    Thickness behind the edge: 0,61 mm
    Factory edge angle: 26/27 degrees inclusive
    Edge finish: rather coarse with lots of bite (my estimate: somewhere around a 1000 grit)
    Sharpness: Can shave my arm- and leg hair with the growth, not against it.
    Not a single microchip can be felt using my nail, or seen through my Victorinox magnifying glass
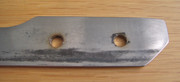
    Handle material: black plastic
    Weight: 83 grams


    I'm going to use the knife the coming months for standard kitchen duty, mostly to see how that rather coarse factory edge will hold up.
    When the time comes i will experiment a bit with resharpening and write about my findings in this thread.

    Nick finishing another Scagel:


    Externer Inhalt www.youtube.com
    Inhalte von externen Seiten werden ohne Ihre Zustimmung nicht automatisch geladen und angezeigt.
    Durch die Aktivierung der externen Inhalte erklären Sie sich damit einverstanden, dass personenbezogene Daten an Drittplattformen übermittelt werden. Mehr Informationen dazu haben wir in unserer Datenschutzerklärung zur Verfügung gestellt.

    Nick Powell is an Australian friend of mine, and although he is a skilled carpenter in daily life, a couple of years ago he discovered that his true passion is making knives.


    Besides making useful models for friends & colleagues in the Brisbane area where he lives & works, once in a while he tries his hand at making Scagel reproductions, purely based on pictures.
    For the handles he uses the same kind of materials that Scagel himself could have used also, but for the blades he chooses various modern stainless steels like for instance CPM-S35VN.
    The heat treatment is done by one of Australia's leading heat treaters, and although Nick only made a few of these models yet they are already starting to gain a following among his growing customer base.
    Currently he still does one knife at a time, but as soon as he can afford a professional grinder he's probably going to make them in small series.


    A few days ago the postman brought me a surprise present: a small but sturdy wooden crate containing Nick's interpretation of this original Scagel, based on the single photograph below:


    And this is Nick's version:


    This is what Nick himself has to say about his work:


    " This knife was actually started for you shortly after doing my first Scagel, but I had given up on it many times after troubles grinding those bevels.
    It is as close to the original model as I could make it, and I even counted the washers and matched them to the same amount as the original.
    I used my favorite steel because I wanted you to test it out, and it's a good balance of sharpening ease in the field and edge retention: hardened to 60-61 Rockwell (so maybe 62-64 in the edge), while the finish is 600 wet and dry (but I need practice as you will see)
    The pommel is navy bronze for corrosion resistance, the guard is brass, and the washers are industrial compressed paper similar to spacer material.
    The leather is compressed embossing leather in black and soaked in antique dye by me.
    Brass spacers , stainless steel and copper as you know, and the handle is shaped for you by eye.
    The leather sheath is clear embossing leather stained with acrylic antique leather stain and finished with saddle makers sealant.
    The guard locks into the sheath for close carry and so the knife won't come out if you forget to close the button stud.
    My design as far as I know, but I'm sure it's been done Lol."


    Specs:


    Overall length: 30,7 cm
    Blade length: 17,5 cm
    Blade thickness: 4,75 mm (ricasso)
    Steel: CPM-S35VN stainless
    Weight: 305 grams
    Sheath: Leather


    His lovely wife Hannah even did a short "making of" video about the knife & it's sheath:


    http://www.youtube.com/watch?v=W35G1Eykzeo

    If the edges are not too wide i just use my Paper Wheels.
    Did these chisel ground edges a while back with a Paper Wheel coated with 15 micron diamond compound, as they both were quite blunt.
    The knives are owned by two Dutch Special Forces guys who used & sharpened them while on tour in Afghanistan, and they wanted the new edges to have a little bling-bling.


    If the edges get a bit wider, especially the slanted edge, then i tend to use my Tormek, like on this Strider GB.
    The factory edge had a wide angle and was also quite irregular, so there was room for some improvement.
    As you can see i didn't refine the scratch pattern on purpose (as i think it looks good on a knife like this), only removed the burr on the Tormek leather honing wheel, followed by some stropping on a leather handstrop coated with 6 micron diamond paste to create a slightly convex microbevel.
    The straight part of the edge now measures around 25 degrees inclusive while the slanted part is about 30 degrees inclusive.


    Or i use a combination of Tormek & Wicked Edge, like on this Strider DB-L some time ago.
    This is a limited edition of the DB model in CPM-3V steel and made from thinner stock than the usual S30V versions.


    Originally it looked like this:


    The straight edge was reprofiled on the Wicked Edge sharpener to 30 degrees inclusive & polished up to 6 micron 3M diamond paste, while the slanted edge was done on the Tormek T7 to 45 degrees inclusive & polished up to 15 micron 3M diamond paste.
    Both edges will treetop armhair, while the straight edge will also whittle hair in some places.
    Now this DB can and will cut, and it still can be used as a sharpened prybar in an emergency.


    Some close-ups:


    Difference between 15 micron and 6 micron;


    A few days ago i sent the owner of the knife a message asking him how the edge was holding up in his use, and today i received this reply (translated from Dutch)


    "During our week & a half holiday in Normandy, France i've used the Sebenza 25 lightly, but daily for opening packages, cutting string, and cutting bread (not on a board)
    Afterwards when i pulled the edge over my thumbnail i could feel a few ever so slight irregularities, but these disappeared with just a few passes over my strop.
    I would still consider the knife to be very sharp: it won't treetop the hair on my arm anymore, but it still shaves it effortlessly on skin level."


    This was my answer:


    "To me the higher degrees of sharpness (hairwhittling & treetopping) are in fact only useful to find out how sharp exactly a certain steel will get with a certain sharpening method.
    In daily use however these sharpness levels will vanish quickly as soon as the knife is used for more than just mowing hair from your arm.


    If at this moment the edge is still able to shave the hair on your arm on skin level i would consider that a good result, and actually even a bit above my expectations considering the lower hardness of earlier Sebenza blades in S30V and S35VN (based on previous Sebenza's i've sharpened as well as user feedback)
    My guess is that the hardness in the Sebenza 25 model is ramped up a bit compared to earlier versions, something i consider to be a good thing.


    Those slight irregularities you feel with your thumbnail could also very well be sticky debris clinging to your edge instead of damage.
    Something even slightly sticky can hang on to your edge tenaciously making it many times thicker and more irregular, thereby making it only seem like there is edge damage while in fact there is none.
    My advice would be to only do the thumbnail test after you've cleaned the edge well (i use a soft piece of cotton with some acetone for this) to make sure it's really clean.
    If after this you still feel irregularities then it's truly damage and it maybe time for the strop.
    BTW: using any strop before cleaning the edge of a knife will very quickly lessen the effectivity of the strop by fouling it.


    I would recommend to use the Sharpmaker when the edge is no longer able to shave armhair, as it is way easier to keep your edge sharp with it than it is to make it sharp.
    Also because a strop is no magic wand: when you let your edge degenerate too far a strop won't help you out, no matter how long you keep stropping.( it will even work counterproductive)
    I only use a strop on already very sharp edges to keep them at a certain level (not to get them there), and only sparingly: just a few stroppings per side should do the trick.
    My advice would also be to get yourself a diamond loaded strop as this will work more efficiently on the hard (vanadium) carbides in the S35VN steel compared to your current one with chromium oxide."

    The owner of this Sebenza 25 bought the knife brand new through an official dealer in the Netherlands, but although he was and is still very pleased with the knife itself, he soon found that the factory edge didn't cut too well.
    He tried to improve things with the help of a Spyderco Sharpmaker and a leather strop loaded with some green compound, but to no avail.
    So he sent the knife to me, and the first thing i did was to measure the edge angle.
    According to my Tormek Angle Gauge it measured 50 degrees inclusive on the straight part of the edge, going up to 55 degrees inclusive from the belly to the point.(!)
    This is how the knife looked before sharpening:


    First i removed the apex of the old edge by cutting a few times directly into an old silicon carbide stone, after which i reprofiled it freehand on my Tormek SB-250 Blackstone to an even 30 degrees inclusive.
    This was followed by a Paper Wheel with 220 grit SiC to smoothen the grindlines made by the Tormek, then refined with a second Paper Wheel coated with 15 micron diamond compound, and finally removed the burr with a third Paper Wheel coated with 0.25 diamond compound. (this leaves the 15 micron scratch pattern intact as much as possible to preserve bite)
    The resulting edge treetops the hair on the back of my hand, can slice single-ply toilet paper, and survives a few cuts into my laminated testblock without any visible damage (checked under bright light with the loupe in my Victorinox SwissChamp)
    This is how the knife looks after sharpening:


    I don't think the holes in the guard are something like a safety lock the RAO uses, there are also no threads in them.
    The owner uses the knife just as it is, and with it's incredibly strong lock i also think there is no need for anything else.
    He was pleased with the new edge by the way :)

    User custom Andrew Demko in CPM-M4 high speed steel from a Dutch forum member


    Before sharpening:


    After sharpening.
    Reprofiled from +/- 30 degrees inclusive to 25 degrees inclusive on a standard Paper Wheel with 220 grit SiC, then refined with a second Paper Wheel coated with 15 micron diamond compound, and finally deburred with a third Paper Wheel coated with 1 micron diamond compound (experimental)
    The new edge survives a few forceful test cuts into my laminated test block without any visible damage (seen through a loupe), after which it effortlessly treetops the hairs on the back of my hand and slices single-ply toilet paper.


    Specs:


    Length open: 8.7 inch (22,2 cm)
    Length closed: 5.3 inch (13,4 cm)
    Blade length: 3.5 inch (8,9 cm)
    Blade thickness: 4,57 mm
    Steel: CPM-M4
    Lock type: Tri-Ad lock
    Handle material: Tan G-10 on titanium liners
    Weight: 214 grams

    Thanks for the offer Stefan, it's appreciated, but i'm not sure yet if i want to go that way.
    With 2,5 mm thickness the knife is already quite thin and i want to preserve as much metal as i can.


    This M2 knife is meant as an experimenting piece: first to find out if i could cold grind the bevels with my Tormek, and second to see what kind of edge this steel will take & hold while performing a variety of jobs.
    Once i get to know it's limits as a pure cutter my plan is to make a few more knives in this steel, and i'm currently thinking of puukko's with a zero edge geometry that would be as thin as possible but still thick enough to take full advantage of the high hardness and it's wear resistance.


    BTW: the holes were drilled by Dutch knife maker Dirk de Wit in his machine shop with a Flott drill press, and Dirk already stated that he would help out if i needed something else done to this knife or another.

    Job done with the help of the Artu drill bit and the drill press of a very helpful Dutch knifemaker.
    The process worked exactly as i was told by an Australian knifemaker with experience in using these Artu's: at first nothing seem to happen until the material warms up a bit, then suddenly the drill bit starts to produce a nice blue burr and drills the hole in a few seconds.
    Afterwards we inspected the drill bit itself, and except for some discoloration of the shaft it was completely unaffected.


    The pics:


    At first the grip screws didn't fit the holes exactly, but after i enlarged one of the holes with the help of a Dremel & a diamond cutter they did.
    Then i shortened the screws (the M2 blade is of course much thinner than the original S30V Strider blade), put on the G-10 grips, and removed the "meat" around the grips for a good fit.
    (except for the finger choil where i kept that little extra steel, since M2 isn't known for it's toughness according to the specs)


    Both the long edge and the short edge now have a mini-bevel finished up to 6 micron diamond compound.
    In the coming weeks i hope to find out how the edge holds up.

    The 6 mm Artu drill bits arrived, so it was time to try them on the M2 steel.
    The instruction paper said that when the drill bits are to be used on hardened steel to use a drill press with 2000 r.p.m, but since i don't own one (yet) i just tried one in a hand held drill.
    I put the knife in a vise with a piece of wood behind it and started drilling; the deeper "dent" is the result of about 15 minutes drilling it this way.


    As you can see i still didn't get through, but the Artu drill bit still did many times better than an average (re-sharpened) masonry drill bit that only managed to make a shiny spot on the M2 steel and go blunt right away in the process.
    Seen with the naked eye the Artu drill bit shows no signs of blunting whatsoever.
    I'm going to tinker with this drill bit some more in the coming days (and maybe look around for a reasonably priced drill press)

    Currently busy making a knife out of a old piece of Sandvik M2 high speed steel machine saw (about 65-66 HRC) with the help of my Tormek T7 wet grinder.
    Since i had a couple of old G10 grips from a Strider DB-L the overall shape was an easy choice, but in the process i added a little belly to the edge.
    The main edge measures 22.5 degrees with a mini-bevel, while the slanted portion measures 25 degrees inclusive with a zero edge.


    Consider to start throwing these carpenter awls.
    Cheap, perfect balance, no risk of cutting yourself, and legal everywhere.
    You hold them by the point when throwing, and mostly we use a half turn spin.
    I've been throwing since my earliest childhood, and this is what i recommend people who want to learn this hobby.


    This is me throwing them: http://www.youtube.com/watch?v=PWA4W3yDbT0
    Me and a friend often do demos for people who want to start throwing, as mostly an old pallet or door and a few playing cards or coasters are all you need.
    The red handled one is 25 years old, the 2 black handled ones are 10 years old, and even better since the tang goes all the way through the handle.
    They will last longest.


    These classic German throwing knives are a possible next step: they have a very good balance, are thrown holding them by the handle, and the point is both wider & thicker, so they hit quite hard.
    They come in a small and in a large size, and are used with 1 full turn spin.
    Personally i prefer the larger versions, but they are very hard to find.


    This Cold Steel Perfect Balance thrower is a copy of an older American design, and it's what i prefer myself these days for hard throwing.
    They are thrown holding them by the handle, the steel is really tough and the knife can easily double as a large campknife.
    Maximum distance i can stick them reliably in a A4 size target is 5,5/6 meters, and we use 1 full turn spin.


    Here is a review: http://www.youtube.com/watch?v=qaZjIfn2jfo

    If you want the best ceramic knives currently available look for the real Kyocera black blades, the Revolution series or the more expensive Kyotop series.
    I sharpen ceramic knives from time to time, and the black knives are much tougher as well have a finer microstructure.
    Both will aid quite a bit in the edge holding department and resharpenability.


    White ceramic knives are best avoided as they have less toughness compared to the real sintered black blades (not the simply black colored ones), and won't hold a fine edge with lower edger angles nearly as long.


    Examples of ceramic knives i've sharpened in the recent past:


    Small ceramic folder


    and


    Sharpening a black ceramic kitchen knife

    Yesterday evening i sharpened the knife (with a standard Paper Wheel with 180 grit SiC grit plus another one with 15 micron diamond compound), and all worked out rather well, besides one ever so tiny microchip at the base which appeared after test cutting into the edge of hard desk top layer.
    First i reprofiled the factory edge from +/- 30 degrees inclusive to 25 degrees inclusive, which seems to be too low for this steel (when leaned on during cutting into this hard & tough material)
    I resharpened it, this time with an edge angle that measures +/- 26-27 degrees inclusive, and now the edge survives the same test without problems.
    In contrast to what the last picture shows, in real life the edge looks a bit hazy, but it's quite sharp.
    It can treetop the hair on the back of my hand, slice single layer toilet paper, and cut the skin of a tomato without slipping.


    I'm thinking about carrying this knife for some time, as from what i've read on various forums S110V should be the most wear resistant stainless steel in the world currently used in production knives.
    Also, if i'm not mistaken, Spyderco runs these at 63 HRC, when another manufacturer seems to have run it earlier at only 59 HRC.


    I'm planning to EDC the knife, but first it needs to be sharpened, as the factory edge sadly wasn't apexed over about an inch, and the complete edge is about as sharp as a butterknife.
    Luckily i have a Wicked Edge as well as a set of Paper Wheels to make it right.


    The knife is put together very well, and the amount of hand finishing is noticeable.

    Thanks, i'm quite happy with it myself :)


    In contrast to many standard Spyderco backlock models which can indeed have quite a bit of up-and-down blade play, i can feel something about the width of an angel hair, and only when trying hard.
    There is no side-to-side play what so ever.


    The guy or girl who put this knife together definitely did a very good job.